Successfully selling your products and services relies on your ability to get in front of as many people as possible. Just like traditional brick-and-mortar stores, people find your products as they browse, but with ecommerce your reach goes far beyond your physical location.
Instead of waiting for people to find you, digital advertising proactively gets you in front of leads. With native ads, content discovery networks like Taboola and Outbrain and even social media marketing, people around the world are exposed to your brand.
But there’s still one more way to get noticed. By leveraging the power of Google Ads, you get in front of people who are already searching for the types of products and services you offer. But if you’ve never used Google Ads, it seems intimidating. That’s why we’ve put together this Google Ads guide to show you how easy it is to get started. We’ll walk you through how Google Ads work and how to get started so that your campaigns get noticed online.
Note: Have you ever been confused by Adwords, Google Ads, Google Display Network, YouTube ads – and how they all use the same Adwords platform? You’re not alone. That’s why on July 24th, Google rebranded this to just Google Ads. Hopefully that clears things up a bit.
What are Google Ads?
Google ads are everywhere. You’ll find them at the top of Search Engine Results Pages (SERPs) when people search for certain keywords, like “how do I do this…,” on the side of web pages and even in YouTube videos.
Depending on where you want to focus your advertising, there are five kinds of ads to choose from: search, display, shopping, video and universal app ads.
Let’s say you’re an online shoe retailer; here’s a look at how each of these ad types works:
Search ads
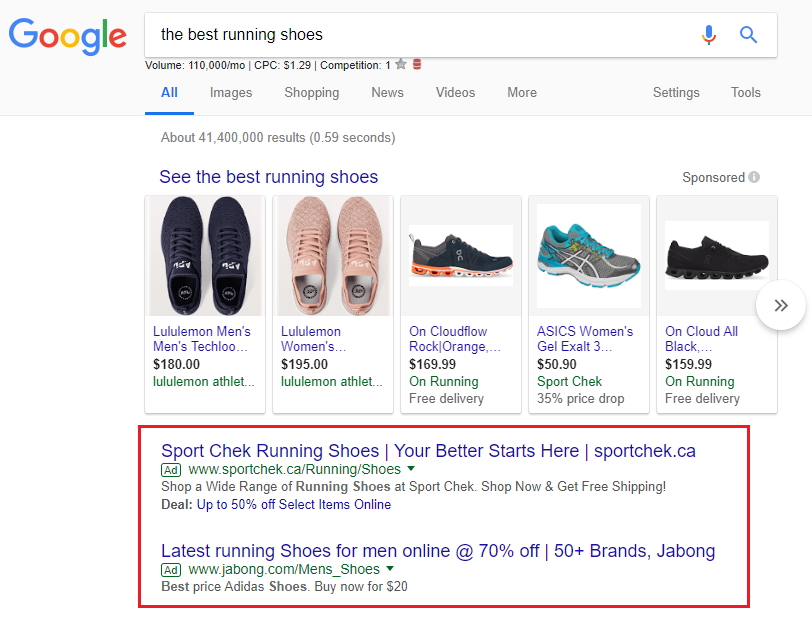
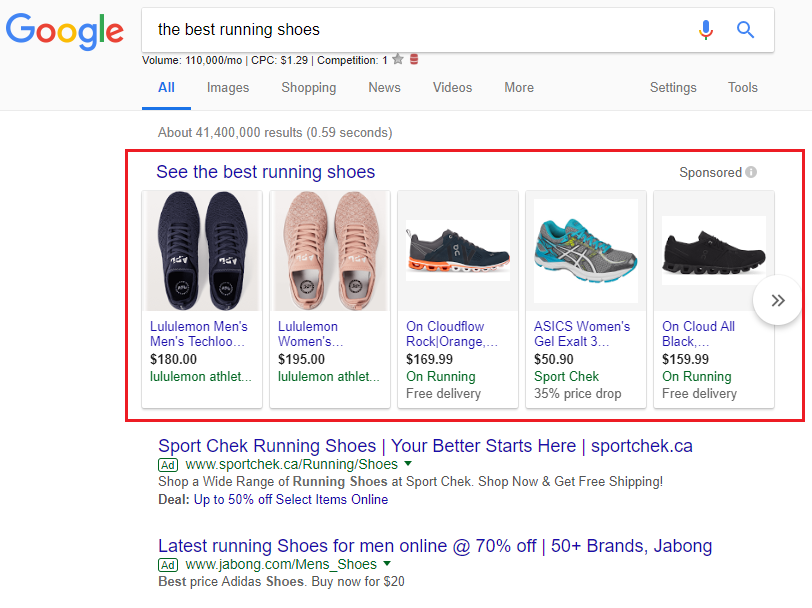
These are the ads that appear at the top of Google searches. If someone searches for “the best running shoes,” this is what the ads look like:
Before people even get to the search results, they’re given a list of options to click on. When you incorporate the keywords entered into Google, your ads appear at the top of the list of search results. The difference between these ads and the other search results is you pay to be seen, while standard search results show up based on the SEO ranking. When people search for words related to running shoes, your ad automatically shows up.
Search ads are beneficial because they appear when people are already searching for products like yours. By paying for an ad, you make sure that your products are seen first before your competitors.
Display ads
The main difference between display and search ads is that unlike search ads where customers have an interest in what they search for, display ads are geared towards people in the awareness stage of the buying cycle. They may not be looking for specific products like yours, but showing ads that offer perks — like a free guide for new runners — will get leads to click and enter your sales funnel.
Choosing keywords for display ads is a little different from search ads. Instead of “running shoes,” try related keywords like “upcoming races in New York” or “running groups in my neighborhood,” and your ad will appear on websites that Google determines are a match for these keywords.
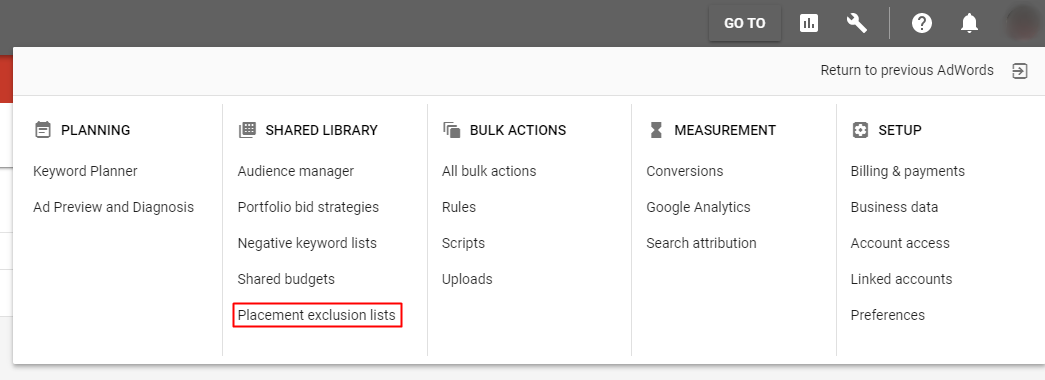
Pro tip: You can check your automatic placements reports to make sure your ads only show up on relevant sites to maximize your conversions. To manage this list, click on the tool icon at the top right of the Google Ads dashboard and select “placement exclusion lists” in the menu popup.
Shopping ads
Like search ads, shopping ads also appear at the top of Google search results pages and target people who are in the interest or consideration phase of the buying cycle. Shoppers have a good idea of what they’re looking for, so getting your ad shown here improves the chances of converting leads and increasing your sales.
Simply create a shopping ad campaign and upload your product data into Google Ads. Google will make sure that these ads show up in searches when customers search for related terms.
Video ads
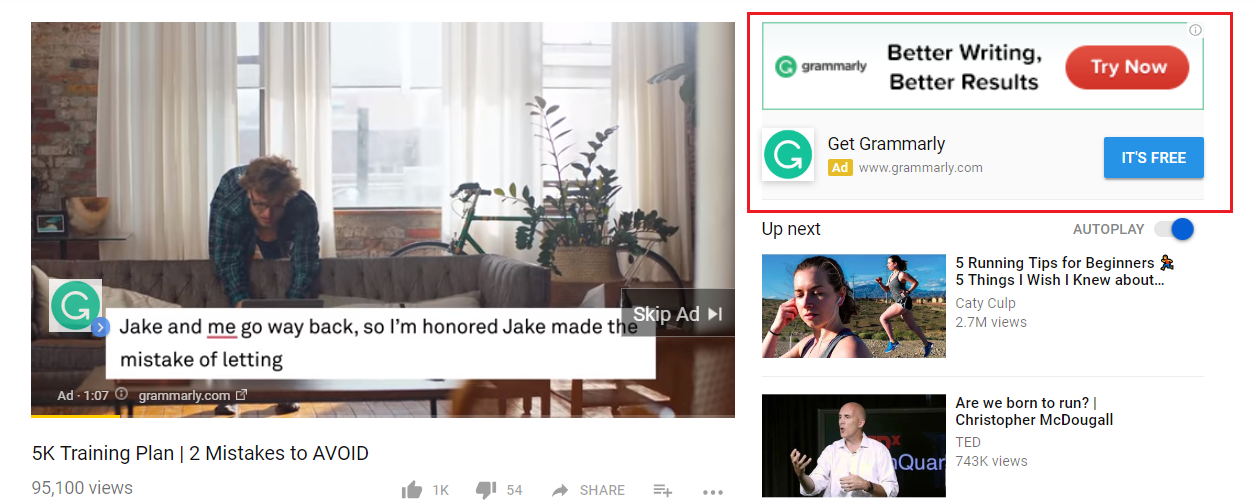
Video ads typically appear before or during YouTube videos. If your audience likes to watch training videos to prep for upcoming runs, then you can place your running-shoe ads at the start or in the middle of these videos. This shows viewers how your product can be used as part of their training. Some ads require viewers to watch them in full before their video content plays. This is a great way to make sure that leads hear your full offer before they click away. In addition to the video ad, a display ad also appears next to the video as a reminder to viewers to click to find out more.
Here’s an example of a Grammarly ad playing before a video and the display ad next to the video.
Keep the display ad simple and get to the point. Like the Grammarly ad, put the value front and center, because, with so many videos to choose from, it’s easy for viewers to move on and not come back if the value of your product isn’t immediately clear. Also, include a call-to-action (CTA) button that is more engaging than “click here” or “submit.” The CTA should tell leads what they have to do — like “Start your trial today” — or the benefit they receive, like “It’s free.”
Universal app ads
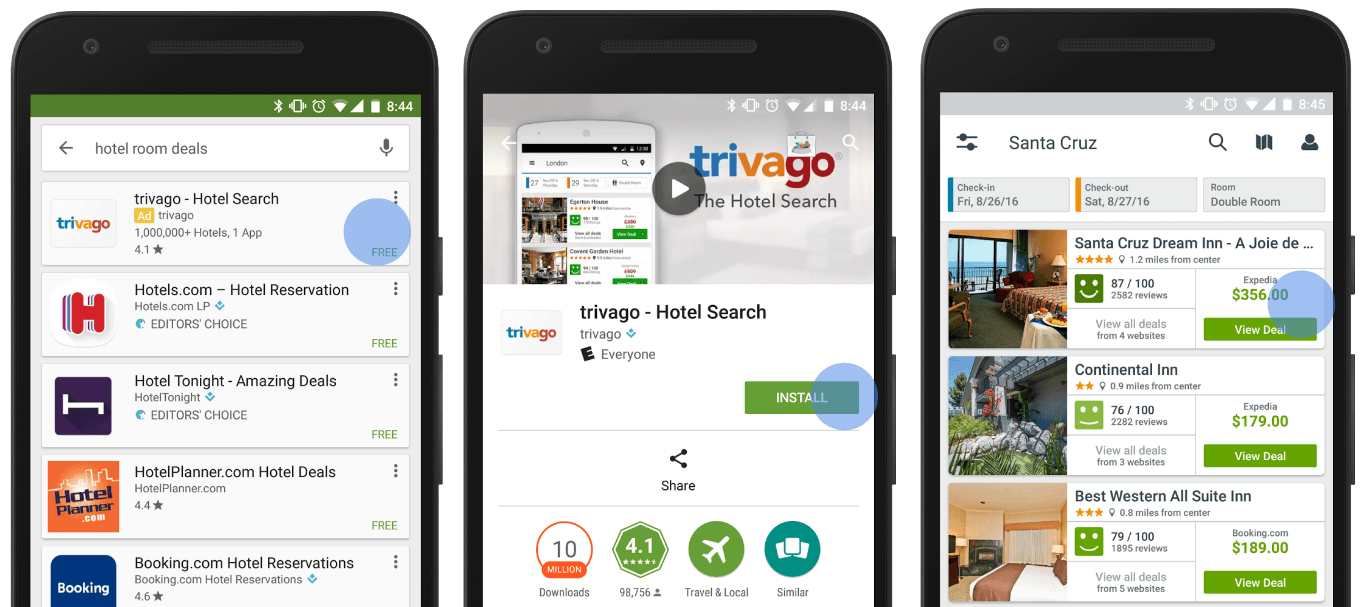
If you have a mobile app, the universal app ads feature is an essential way to advertise it. Using Google Networks like Google Search, Play, YouTube, Gmail and others allows your ad to be seen by relevant audiences.
[Source] In Google Play your ad will appear at the top of search results depending on the keywords entered.
When you upload your ad copy and images to Google Ads, Google automatically creates combinations of the two and places ads where they’ll be seen by the right target audience. Just like with search ads, you can decide what app the ads should focus on. For example, you can choose to focus on app conversions if you’re launching a companion app for your product — like a fitness tracker or meal planner if you sell running shoes — and want to grow your user base quickly.
Getting started: how to create and manage ads for ecommerce
Now that you have the basics of the types of ads available through the Google Network, the next part of this Google Ads guide will show you, step-by-step, how to set up a campaign and manage your ads.
1. Set up a campaign
If you think of Google Ads as a tiered system, campaigns are at the top with multiple ads underneath each campaign. Ads are individual announcements that promote a product or service related to the campaign. A campaign can have one ad or multiple ads depending on how you choose to advertise your products. So if your campaign is called “running shoes,” the ads in the campaign can be more specific, like track shoes, long distance running shoes and so on. We’ll explore this idea in more detail a little later.
To create a campaign and corresponding ads, you need to set up a Google Ads account. It’s free to sign up and you’re only billed when leads click on your ads. Head over to https://adwords.google.com to sign up.
Once you’ve set up your account, you’ll be prompted to create your first campaign. You don’t have to create a campaign right away. When you log in again you’ll be taken to the Google Ads dashboard where you can create new campaigns.
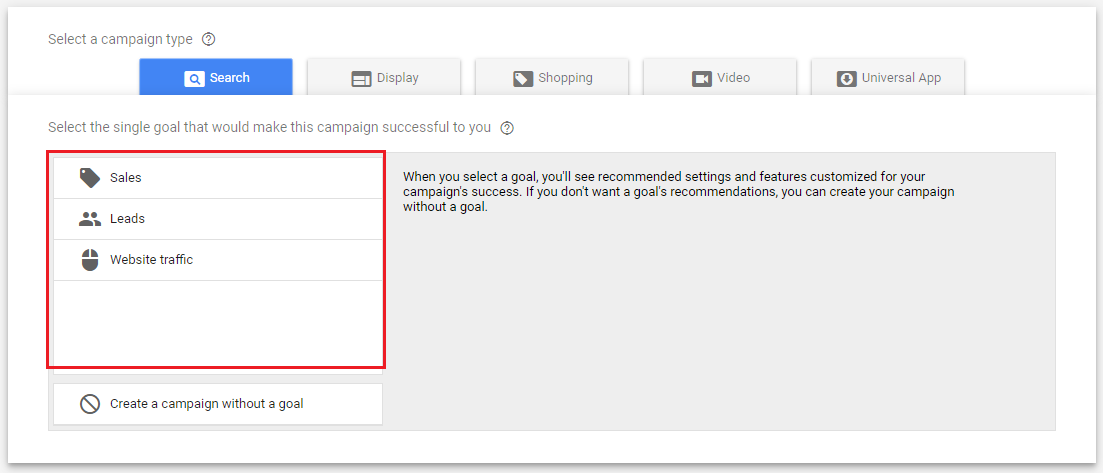
Let’s create a search ad. From the dashboard click on Campaign on the left panel and click create. Select Search and you’ll be asked to choose what to optimize the ad for. You can choose sales, leads or website traffic:
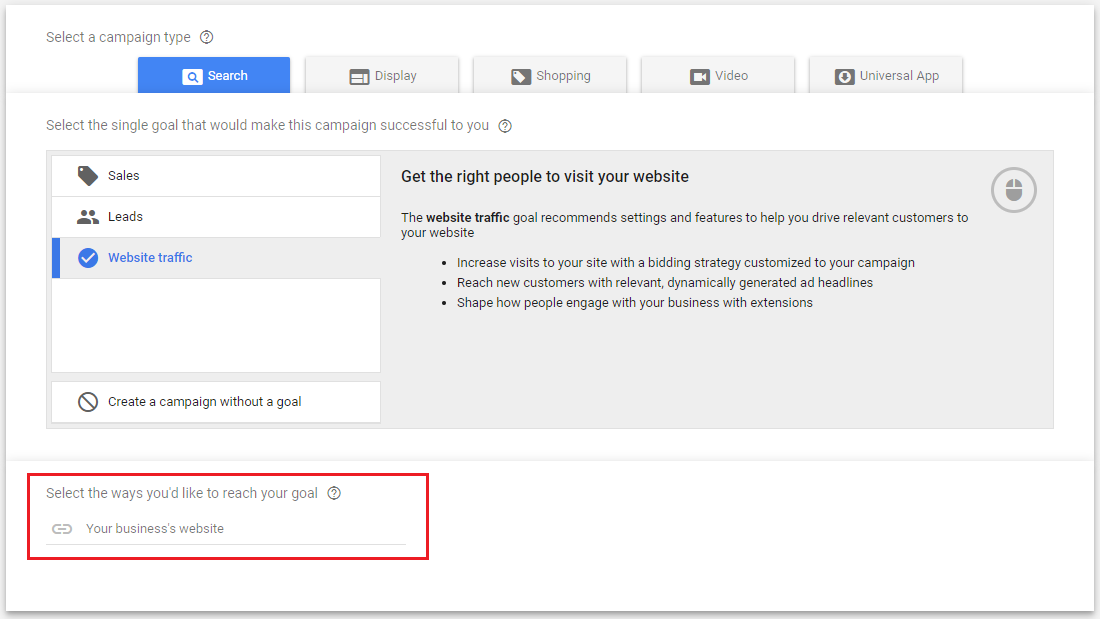
If, for example, you choose to optimize for website traffic, you’ll be asked to enter your business URL.
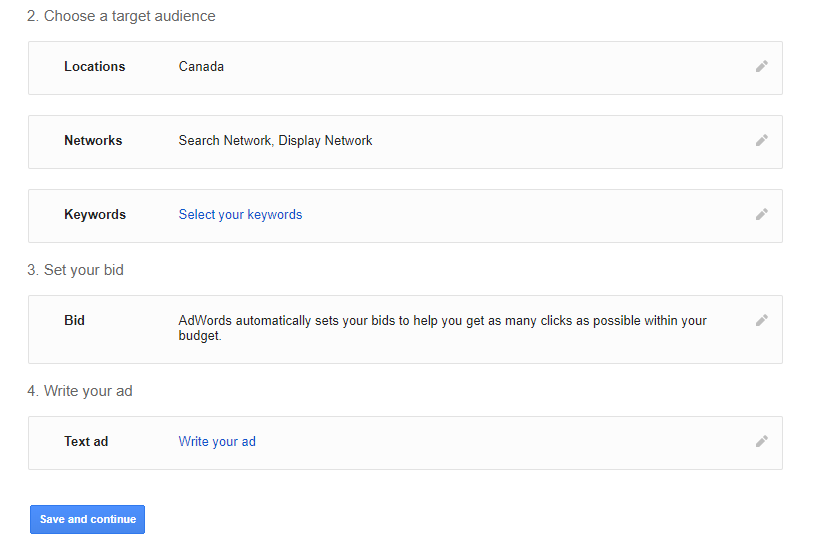
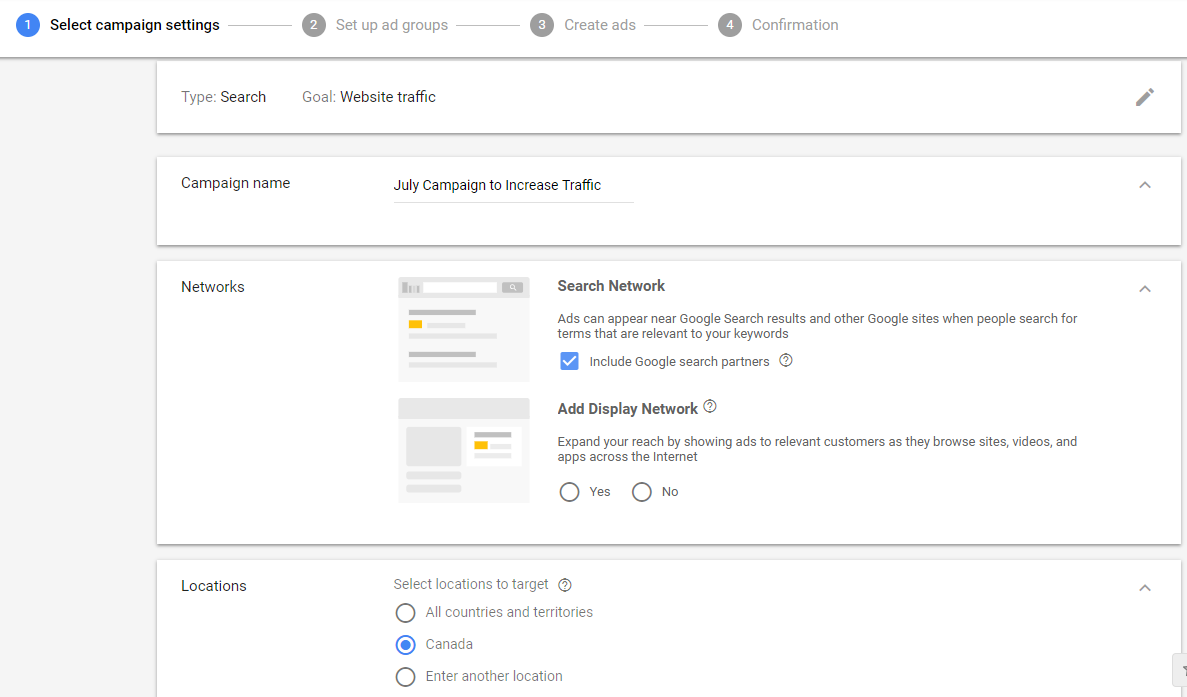
Next, give your campaign a name, and if you want to include a display ad, you can do that from here. Choose where your ad will be shown. If you only send products within North America, you can set this now. Otherwise choose “all countries and territories” if you ship products globally so that your ads are seen by more people.
Another helpful feature is to choose the language your ad is seen in. Campaigns default to English, but you can choose specific languages or add all languages if your products are available globally.
2. Set your budget and bid amounts
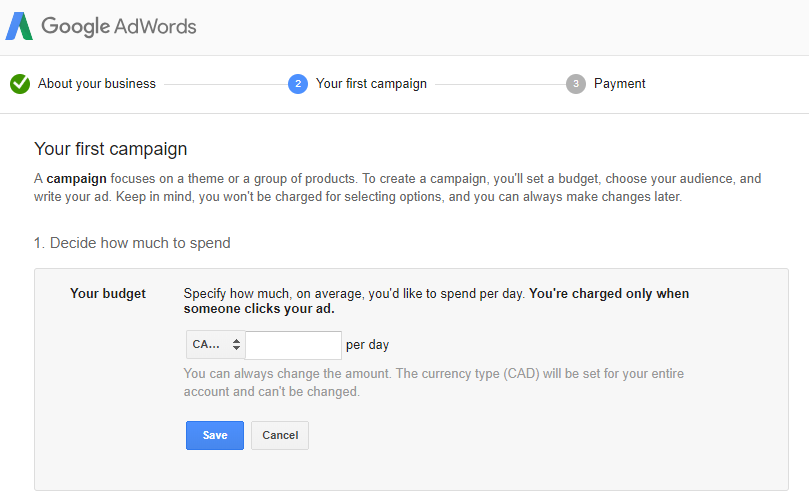
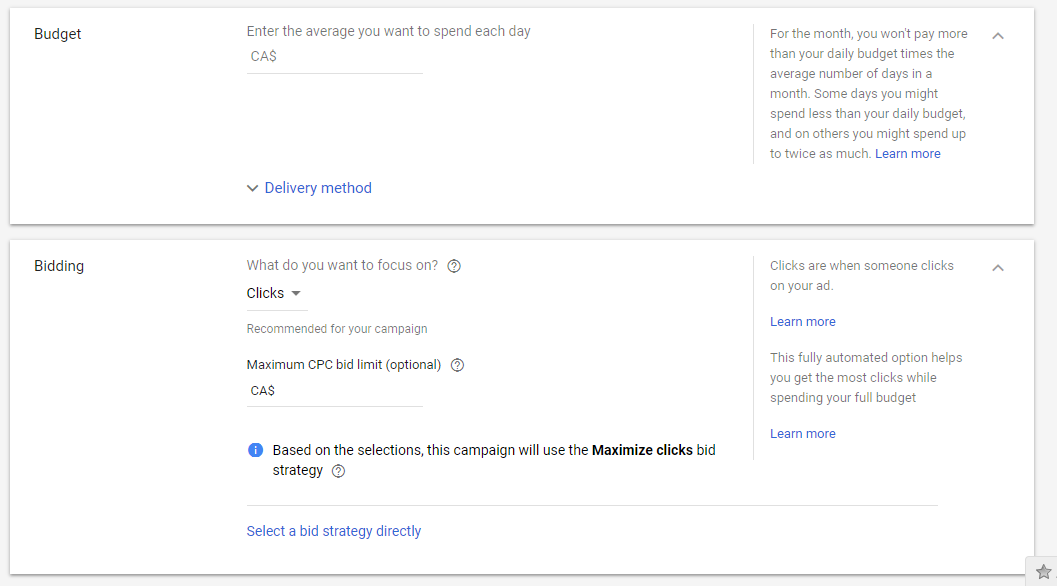
As you set up your campaign parameters, you’ll also be asked to set your budget and bid amounts.
To set your budget, take your monthly ad budget and divide it by the average number of days in a month — Google uses 30.4 days — and use that amount as your daily budget. If you’re just starting and your monthly budget is $500, your daily budget would be 500/30.4 = $16.45.
Set your budget based on your advertising needs and goals. For example, if you’re just starting out with a new product line and want to test how your audience will respond, start with a smaller budget, then experiment and increase the budget over time.
Your campaign’s total budget should be set depending on how long you want to run your campaign. Let’s say you want to run a two-week ad every month; Google Ads will automatically spread out your budget over the duration of the campaign to get you maximum exposure and traffic back to your site.

For your bid strategy, you can choose what to focus on to make sure your budget is being spent in the right places. For example, you can focus on how many clicks your ads get, the number of conversions or the conversion value.
3. Create ad groups
The next step in setting up your campaign is to create ad groups. Think of these as the group of keywords — and their ads — associated with your campaign.
Your campaign is an overview and the ad groups are more specific subsets of the campaign. For example, your campaign might be “shoes” with ad groups for women’s shoes, men’s shoes and children’s shoes.
Here’s an example of how campaigns, ad groups, keywords and ads relate to each other:
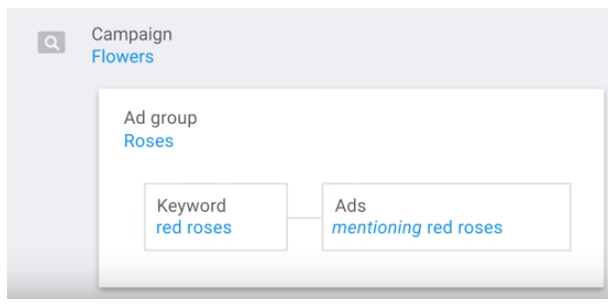
A good rule of thumb is to keep related keywords in their own ad group to stay organized and to help with tracking later on.
4. Choose keywords
The keywords you choose, particularly for search ads, are based on terms that your audience is already searching for in Google and relate to your product or service. This is what determines whether your ad gets seen.
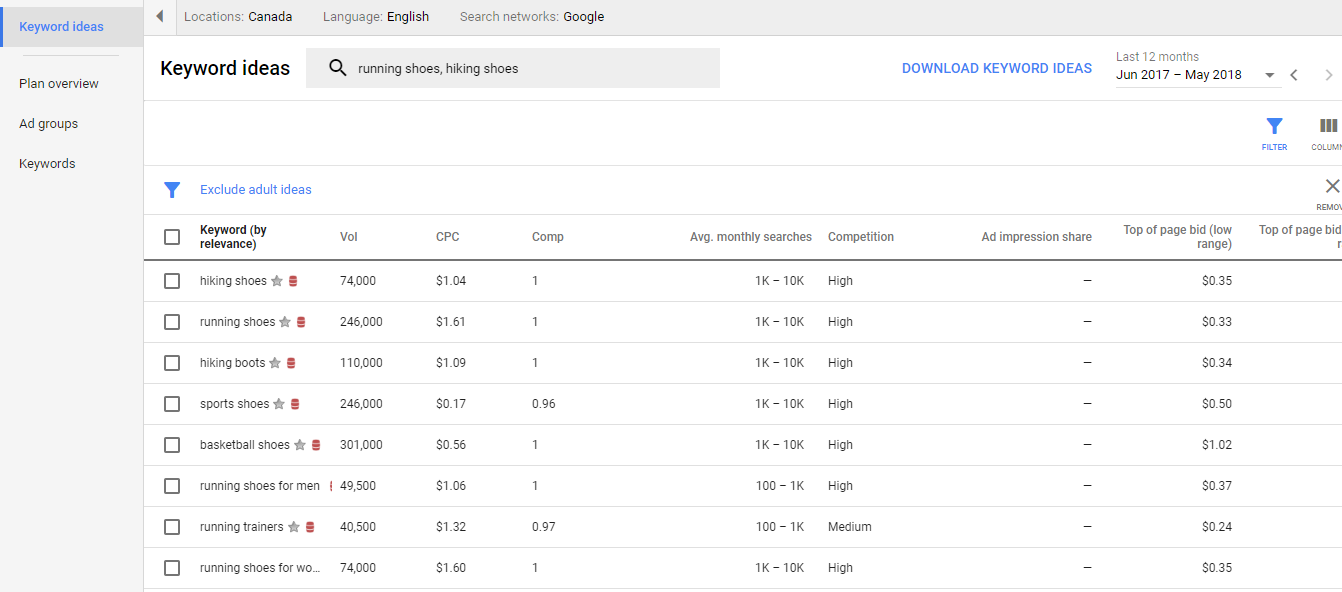
Give each ad group a name and choose three to five keywords based on your product or service. Google Ads will even offer suggestions based on your website to get you started.
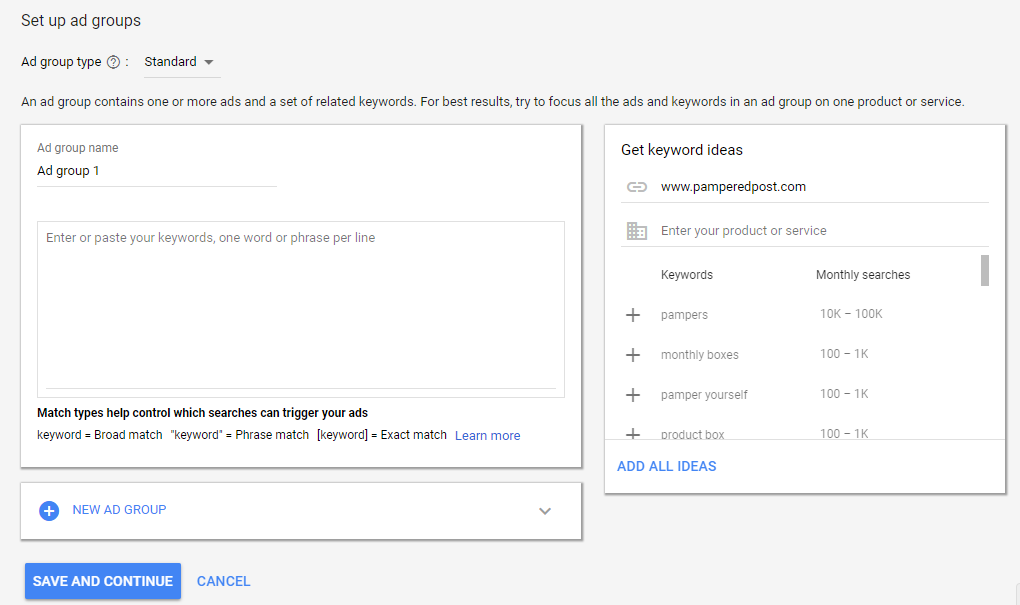

When you look for new keywords, enter a keyword related to your product:

5. check Ad analysis
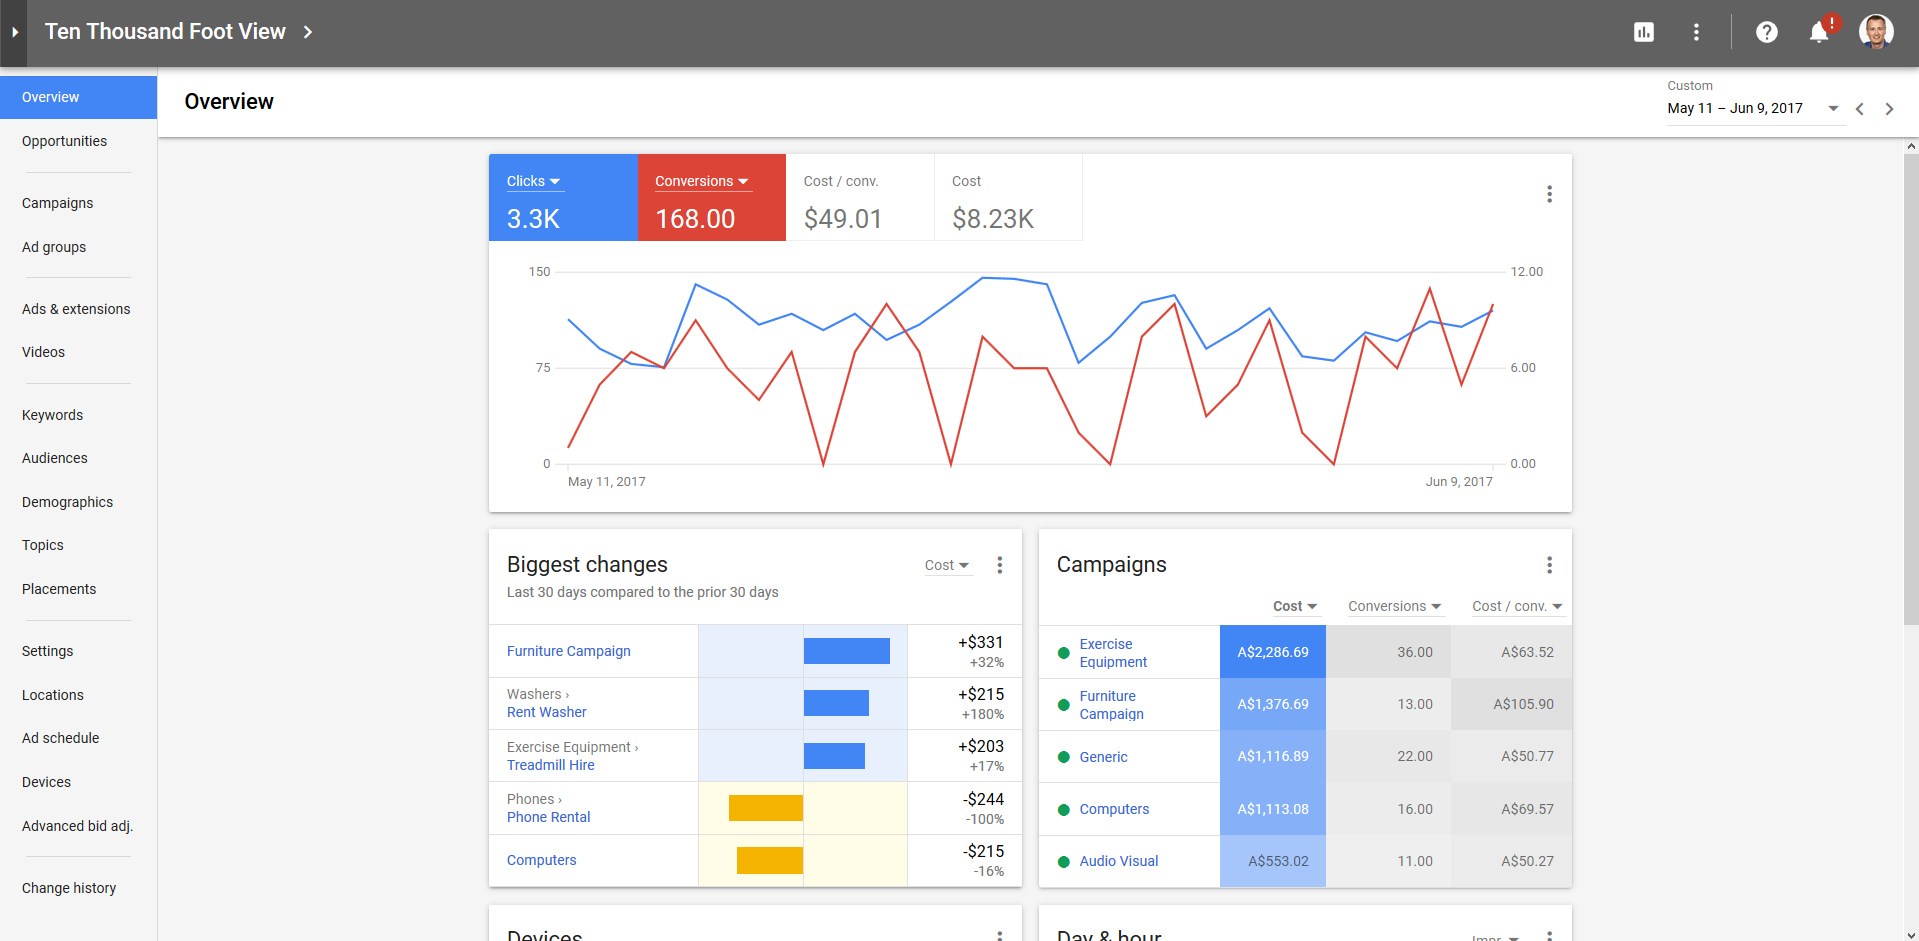
Once your ads start running, you’ll notice that the dashboard highlights campaign data the next time you log into Google Ads. Use this to data track which ads performed the best, what audiences clicked on the most and so on.
[Source]
Customize the chart at the top of the page — where metrics appear in red and blue — to look at the most important metrics. You can choose to look at conversions, clicks and impressions over time. To get a good sense of trends over time, pick a date range for the report and track data from the past three months as a start.
The cards below the chart show more detailed information about your campaign and ads. For example, you can compare how much each of your campaigns cost and the resulting conversions. You can see which strategies worked best and are worth repeating.
Change your bid strategy or budget to improve your ad reach and then track the new ads to see the impact on your audience.
Key takeaways from this Google Ads guide
Now you’re ready to create and track your own ads using the Google Network. As you work through the process and create and adjust ads, here are a few takeaways to consider:
- Plan before you start. It takes some time to set up your first campaign, but as you run more campaigns you’ll see how quickly ads come together. However, take the time to think about the objective of your ad so that you know what to track once the ads are live. Get organized and set up a campaign for each of your product categories. Track the parameters you use in Google Sheets so you can look back as a reference for future campaigns.
- Experiment with copy, budget and ad type to find what results in the most conversions. As you get to know your audience and what types of ads and content they engage with the most, you can tailor your ads over time. Every aspect of your ads is flexible, so test different combinations to see which ones result in a constant stream of people flowing through your sales funnel.
- Experiment with who sees your message. You can target your audience based on where they’re located or where you want to sell your product so that only the “right people” see your ads. For example, if you’re planning to enter a new market, run a new ad before you promote the fact that you’re expanding. See how this new audience responds and make adjustments to your ad campaign. Consider this approach another form of market research where the results help you refine your ad targeting to a small group before you start running formal promotional campaigns.
Take a stab at creating your first campaign and let us know how it works out for you!
